Archive for the ‘Microsoft System Center’ Category

Operations Manager: How to monitor Windows Services

There are many posts on internet which descripe how to monitor windows services using scripts, but in my case i used ready Windows Services Wizard to add what services i need to monitor, it is long way to configure all services but the best you will only configure the service you need on one server and OPM will do the rest of work 🙂 as it will add same service from other servers already under monitor:)

To monitor services just follow below steps:

1- Open Operations Manager Console.

2- Navigate to Authoring tap and under Management Tap template click Windows Service.

Image

3- Right click and click Add monitor wizard.  

4- From welcome page select Windows Service and click Next.


Image


5- Type The service name in my case i will monitor Microsoft Exchange Transport service, management pack you can select default management pack then click Next.

Image


6- On service name field click selection button type computer name for any Exchange server you monitor and press enter then select the service, for Targeted Computer you can select All Windows Computers then click Next.

Image


7- Configure performance threads you want and click Next then create.


Now we will create new State view under Monitoring tap so we can view all added services.

1- Under Monitoring tap right click and select New state view.

2- Under state view configuration type State view name “Windows Services”, under Show data related to click selection button the click View All targets and search for Windows Service select and click Ok.

Image


3- In View properties check all information and click Ok.

 Image

4- You can personalize the view of State view by right click on the view then click personalize view add column you need arrange as you need and also you can make grouping.

Image


5- Here we are now 🙂

Image

Monitoring your website using Microsoft Operations Manager

Your organization had it is websites and you want monitor it’s availability, you need once site goes down got mail, just follow below steps using Operations Manager 2012 SP1:

1- Open Operations Manager Console.

2- Under Authoring tap >> Management Pack Templates, click on Web Application Availability Monitoring >> Right click and click on Add Monitoring Wizard.

3-   On Select Monitoring Type select Web Application Availability Monitoring then click next.

Image

4- Under general tap type friendly name for the monitor, and select management pack,

Image

5- On what to monitor tap type name of the monitor again and URL of the site you need to monitor.

Image

6- Under Where to monitor from you can add the location where you will monitor your website from, click on add then under Internal location-Agent click Search, select the place and click add then Ok, you will back again to Where to Monitor from pane click next.

Image

7- Finally under View and Validate Tests pane you can test the added Monitor by click Run Test.

Image

also you can monitor configuration frequency, performance data collection, test time out, Performance Collection..

Image

8- On summary pane you will review all monitor configuration for any correction you can click Previous to check what you need to change.

Fast your seat belt be happy your website under monitoring now:)

Bulk delete Management Packs in Operations Manager 2012

I do deployment for Operations Manager 2012 but by mistake i installed Non English Management Packs :(, i want to delete it but how is started to delete it one by one offfff it will take long time to do, then i get to road Operations Manager Power shell 🙂 what a magic tool, below commands i used to do this:

Get specific management pack include specific name

Get-SCOMManagementPack | where{$_.displayname -like “*windows*”}


PowerShell syntax to show all non-English Management Packs currently in the environment:

Get-SCOMManagementPack | where{$_.defaultlanguagecode -notlike “ENU”}

PowerShell syntax to remove all non-English Management Packs currently in the environment:

Get-SCOMManagementPack | where{$_.defaultlanguagecode -notlike “ENU”} | Remove-SCOMManagementPack


Remove all non-English Management Packs:


Operations Manager: All Management Servers Resources Pool alert

Have just installed System Center Operations manager 2012 and got the error then it closed automatically after time then raised again:

The All Management Servers Pool has not reported availability since….. This adversely affects all availability calculation for the entire management group.

Image


Image


No alert context 😦

if you navigate to Operations Manager tap >> Management Group Health under monitoring tap as below:

Image


You will find all health converted to gray

Image


then suddenly health changed as below:

Image

Solution:

Just make sure that time synchronicity with DC run below command

Net time \\DC.Domain.com /set

finally issue solved after  long time of search and trying many solutions:)


Image

System Center Operations Manager 2012 Update Rollup 1

Overview

Update Rollup 1 contains a number of fixes for System Center 2012 Operations Manager, including cross platform fixes, as well as support for Oracle Solaris 11. A number of fixes may require manual steps to install. 

A detailed list of fixes can be found on Knowledge Base Article KB2686249.

System requirements

  • Supported operating systems: Windows 7, Windows Server 2008, Windows Server 2008 R2, Windows Server 2008 R2 SP1, Windows Vista
  • Other Software: System Center 2012 – Operations Manager


Operations Manager Update (KB2674695) – Windows monitoring

Issue 1

Environment crashes in Operations Manager because of RoleInstanceStatusProbe module in AzureMP.

Issue 2

When multiple (two or three) consoles are running on the same computer under the same user account, the consoles may crash.

Issue 3

You cannot start or stop tracing for Reporting and Web Console if they were installed to a stand-alone server that is running IIS.

Issue 4

Connected Group alert viewing is not working, but no error is given in console.

Issue 5

Task result – CompletedWithInfo not supported with the SDK2007 assemblies.

Issue 6

SeriesFactory and Microsoft.SystemCenter.Visualization.DatatoSeriesController have to be public to give the controls extensibility and reuse.

Issue 7

WebConsole is not FIPS compliant out of the box.

Issue 8

Network Dashboard should overlay Availability when displaying health state.

Issue 9

Dashboards: Group picker does not show all groups in large environment.

Issue 10

IIS Discovery: Prevent GetAdminSection from failing when framework version was detected incorrectly by IIS API.

Issue 11

Performance Counters are not displayed in the Application list view of AppDiagnostics.

Issue 12

Console crashes when state view with self-contained object class is opened.

Issue 13

PerformanceWidget displays stale “last value” in the legend because of core data access DataModel.

Issue 14

Availability Report and “Computer Not Reachable” Monitor display incorrect data.

Issue 15

Agent install fails on Win8 Core because of dependency on the .NET Framework 2.0.

Issue 16

Web Services Availability Monitoring Wizard – Console crashes if the wizard finishes before a test has finished.

Issue 17

Several Windows PowerShell changes are needed:

  • Changed License parameter in Get-SCOMAccessLicense to ShowLicense
  • Changed SCOMConnectorForTier cmdlets to SCOMTierConnector
  • Some formatting changes

Operations Manager Update (KB2674695) – Unix and Linux monitoring

Issue 1

Schannel error events are logged to the System log on Operations Manager Management servers and on gateways that manage UNIX/Linux agents.

Issue 2

On HP-UX, Operations Manager cannot discover and monitor a logical volume composed of more than 127 physical volumes.

Issue 3

Upgrade of UNIX and Linux agents fails when using Run As credentials in the Agent Upgrade Wizard or Update-SCXAgent Windows PowerShell cmdlet.

Operations Manager Update (KB2674695) – New feature

Update Rollup1 for Operations Manager adds support for Oracle Solaris 11 (x86 and SPARC).


Deploy steps:

1.   Backups. 

I run a fresh backup on my OpsDB and Warehouse DB’s – just in case something goes really wrong.

I also will take a backup of all my unsealed MP’s. You can do the backup in PowerShell, here is an example which will backup all unsealed MP’s to a folder

Get-SCOMManagementPack | where {$_.Sealed -eq $false} | export-SCOMmanagementpack -path C:\UMPBackup

We need to do this just in case we require restoring the environment for any reason.

Image

 2. Apply the hotfix to the Management Servers.

Tip #1:  Reboot your Management Server nodes before starting the update. This will free up any locked processes or WMI processes that are no longer working, and reduce the chances of a timeout for a service stopping, file getting updated, etc.  This is not a requirement, just something to consider if you have had issues applying such a fix.

Tip #2:   If you are running any SDK based connectors – it is a good idea to stop these first. Things like a Remedy product connector service, Alert Update Connector, Exchange Correlation Engine, etc… This will keep them from throwing errors like crazy when setup bounces the SDK services.

Here are the files after extraction:

image

 I start on my first management server which has all roles i started with below secuance:

Image


Another spot-check to make, is to each that the Agent binaries get updated on each Management Server role, for Windows agents.  These are located at: \Program Files\System Center 2012\Operations Manager\Server\AgentManagement\ in the AMD64 or i386 directory:

Check to ensure that the CU dropped the appropriate agent update file, such as KB2674695-amd64-Agent.msp.

image


Apply the hotfix to my Gateway Servers.

I don’t have any gateways in my lab right now – but this would be a very simple execution of the KB2674695-AMD64-Gateway.msp file.

Import the management pack updates

Open a console – and import the files previously extracted:

Microsoft.SystemCenter.DataWarehouse.Library.mp

Microsoft.SystemCenter.Visualization.Library.mpb

Microsoft.SystemCenter.WebApplicationSolutions.Library.mpb

image

These all import in a few minutes without a hitch.


Agents: Apply the hotfix to my agents by approving them from pending

I open the console – Administration > Device Management > Pending Management, and see all my agents in pending that are not manually installed (Remotely Manageable = Yes)

Let me stop and talk about how agents get into Pending.  This is a ONE TIME operation, which is created at the time that you run the CU on a management server.  What will happen, is that the CU runtime will look for all agents ASSIGNED to that management server, that are Remotely Manageable (not manually installed) and will put ONLY those agents into pending at that time.  We will not ever go back and re-inspect to put old agents into pending, because this is not a SCOM workflow that handles this.  It is done only by applying the update.  If you don’t have agents in pending – you either aren’t running the MSP in an elevated fashion, or you aren’t running the update as a user that is BOTH a SCOM admin, Local OS Admin, and SQL Systems Administrator role to the databases.

Agents: Update manually installed agents…. well, manually.

I simply run the file KB2674695-AMD64-Agent.msp or KB2674695-i386-Agent.msp depending on which OS version (64bit or 32bit) I am updating.  I can deploy these manually, or via software distribution packaging up each MSP and applying them to the correct OS by version/architecture.


New features for Operations Manager in System Center 2012 SP1

New Monitoring Capabilities

Monitoring Windows Services Built on the .NET Framework

One of the most commonly requested features that was present in AVIcode, but not yet re-implemented in System Center 2012 – Operations Manager was the ability to monitor Windows Services, not just IIS-hosted applications. This is now possible again, and integrated into the APM template.

Automatic Discovery of ASP.NET MVC3 and MVC4 Applications

If the application contains “System.Web.Mvc.dll” in the /bin subfolder, it is now automatically discovered as an ASP.NET Web Application without the need to use the overrides that were documented in the APM.WEB.IIS7.mp Guide.

New Transaction Types: MVC Pages and WCF Methods

New transaction types have been introduced for MVC pages and for MVC methods. This augments the capability to specify more detailed settings for a given feature of your application. How to use this feature is documented in the APM template documentation.

Enabled APM of SharePoint 2010

Operations Manager lets you monitor SharePoint web front-end components. You can monitor standard and custom SharePoint web pages for performance degradation and server-side exceptions. You can set up monitoring for SharePoint applications in much the same way you enable monitoring for other .NET web applications. Use the .NET Application Performance Monitoring template to configure SharePoint application monitoring. When monitoring SharePoint applications for exceptions, the exception call stack contains the relevant SharePoint specific parameters for troubleshooting.

Integration with Team Foundation Server 2010 and Team Foundation Server 2012

To speed interactions between operations and development, it is essential to quickly detect and fix problems that might need assistance from the engineering team. System Center 2012 Service Pack 1 (SP1) – Operations Manager can integrate with development tools, such as Team Foundation Server (TFS) and Visual Studio, enabling deep troubleshooting and streamlining communications between developers and IT operations. You can synchronize Operations Manager alerts and Team Foundation Server (TFS) work items. Operations Manager integration with TFS introduces a new work item type definition, Operational Issue, which can be embedded into any of your organization’s engineering processes. After enabling synchronization, IT operations can manually assign alerts to the engineering team. Assigning an alert to engineering creates a new work item in Team Foundation Server. The workflow tracks and synchronizes changes made to TFS work items and changes made to associated alerts in Operations Manager.

Conversion of Application Performance Monitoring events to IntelliTrace format

This new monitoring capability allows for opening of APM exception events from Visual Studio IDE as if the exception was captured during the IntelliTrace historical debugging session. Developers can stay within their familiar environment to examine complete exception call stack, for example: method parameters captured at the time of exception, and can navigate between the source code modules that participated in the exception call chain. Tightly integrated with TFS Work Item Synchronization Management Pack, this capability instantaneously brings generated IntelliTrace logs to TFS work items assigned to engineering. This can result in streamlining communications between IT Operations and Development and enriching the development experience with analysis of root causes of the application failure, reducing the mean time to recovery (MTTR) for the problems detected by APM.

Collecting Historical Traces Using IntelliTrace Profiling Management Pack

System Center 2012 SP1 – Operations Manager includes IntelliTrace Profiling Management Pack. This management pack lets you capturing historical traces directly from the Operations Manager console. These traces can help developers investigate problems by giving them visibility to application execution history without the developers needing access to the servers where the applications ran. Developers can use Visual Studio 2012 Ultimate to open collected traces.

IntelliTrace Profiling Management Pack automatically deploys the necessary infrastructure, IntelliTrace Collector, to the designated servers. When traces are collected, they are uploaded to a network file share and attached to Operations Manager alerts. Traces are uploaded to the management server using the same secure Operations Manager channel that agents use to communicate with the management servers. By configuring Team Foundation Server (TFS) synchronization, traces can be automatically added or linked to TFS work items.

360 .NET Application Monitoring Dashboards

System Center 2012 Service Pack 1 (SP1), Operations Manager can show you different perspectives of application health in one place—360 .NET Application Monitoring Dashboards. The 360 .NET Application Monitoring Dashboards display information from Global Service Monitor, .NET Application Performance Monitoring, and Web Application Availability Monitoring to provide a summary of health and key metrics for 3-tier applications in a single view. The 360 .NET Application Monitoring Dashboards show where an application is unhealthy and provide a launch point for detail dashboards that highlight component-level issues.

The 360 .NET Application Monitoring Dashboards display data from powerful monitoring tools. .NET Application Performance Monitoring looks deep into the application to get details that can help you pinpoint solutions from server- and client-side perspectives. Web Application Availability monitoring in Operations Manager monitors internal synthetic transactions. Global Service Monitor monitors the availability of applications from an outside location, measuring availability from where the user is.


Support for CentOS, Debian, Oracle, and Ubuntu Linux

System Center 2012 Service Pack 1 (SP1), Operations Manager has added support for monitoring of the following Linux operating systems:

  • CentOS 5 (x86/x64)
  • CentOS 6 (x86/x64)
  • Debian 5 (x86/x64)
  • Debian 6 (x86/x64)
  • Oracle Linux 5 (x86/x64)
  • Oracle Linux 6 (x86/x64)
  • Ubuntu Server 10.04 (x86/x64)
  • Ubuntu 12.04 (x86/x64)

Improved Heartbeat Monitoring

Heartbeat monitors for Operations Manager UNIX and Linux agents now support configurable “MissedHeartbeats” – allowing for a defined number of failed heartbeats to occur before generating an alert.  Failed heartbeats will now cause Operations Manager to unload rules and monitors for UNIX and Linux agents until the heartbeat is restored.  This makes it very easy to identify UNIX and Linux computers with failed heartbeats in the Operations Manager console.

For more detailed information on these improvements please see this page:

http://technet.microsoft.com/en-us/library/jj656650.aspx

Install a System Center Operations Manager agent on a workgroup computer without using a gateway server

install a System Center Operations Manager agent on a workgroup computer without using a gateway server

You need to have:

1-      Certificate Authority on same domain for Operations Manager.

2-      Certificate Authority Chain certificate

3-      Certificate for Work Group/Non Domain computer.

How to monitor a workgroup computer without using a gateway server

1-      Import the Root CA certificates for the management server and for the Work Group/Non Domain computer. To do this, follow these steps.
a)      From the server desktop, open a Web browser, and then point it at the certification authority server. For example, type the following address:

b)     http://certification_authority_server/certsrv

c)      Click Download a CA certificate, certificate chain, or CRL.

d)     Click Download CA certificate chain.

Note A certificate that is named Certnew.p7b is downloaded. Save this certificate on the desktop.

e)      When the download is finished, click Start, click Run, type mmc, and then click OK to open a Microsoft Management Console (MMC) instance.

f)       On the File menu, click Add/Remove Snap-in, click Add, and then click Certificates.

g)      Click Add, select Computer account, and then click Next.

h)     Select Local computer, click Finish, click Close, and then click OK.

i)       Under Trusted Root Certificate Authorities, right-click Certificates, point to All Tasks, and then click Import.

j)       Click Import, and then click Next.

k)     When you are prompted for the certificate file, click Browse.

l)       Change Files of type to PKCS #7 Certificates (*.spc,*.p7b ).

m)   Click the appropriate certificate file that you downloaded from the certification authority server, and then click Open.

n)     Click Next, and then click Finish.

2-      Configure the enterprise root certification authority server to support the Operations Manager certificates. To do this, follow these steps (Create Certificate template):

a)      Use domain administrator credentials to log on to the enterprise certification authority server.

b)     Click Start, click Run, type mmc, and then press ENTER.

c)      On the File menu, click Add/Remove Snap-in.

d)     Click Add.

e)      Under Add Standalone Snap-in, click Certificate templates, and then click Add.

f)       Click Certification Authority, and then click Add.

g)      In the Certification Authority snap-in, select the Local computer (the computer this console is running on) option.

h)     Click Finish.

i)       Click Close, and then click OK.

j)       In the Certification Authority snap-in, verify that the Certificate Templates snap-in and the Certification Authority snap-in appear.

k)     Click Certificate Templates.

l)       In the details pane, right-click Computer, and then click Duplicate Template.

m)   On the General tab, change the template name to a meaningful name for your organization. For example, you can use OpsMgr2007 as the template name. Verify that the validity period meets your organization’s requirements.

n)     Click the Request Handling tab, and then click Allow private key to be exported.

o)     Click the Subject name tab, and then click Supply in the Request option.

p)     Click the Security tab.

q)     Grant Enroll and Auto enroll permissions for the following groups in all domains:

    • Authenticated       users
    • Domain       Admins
    • Domain       Computers
    • Enterprise       Admins

r)      Click Apply, and then click OK.

s)      To verify the settings, expand Certificate Templates.

t)       In the details pane, right-click the template that you configured, click Properties, verify your settings, and then click OK.

u)     Expand Certification Authority (local), and then expand your certification authority.

v)     In the console tree, right-click Certificate Templates, point to New, and then click Certificate Template to Issue.

w)   Select the new template, and then click OK.

x)      Verify that the new template appears in the details pane, and then verify that the Server Authentication entry and the Client Authentication entry appear under Intended Purpose.

y)     Close the snap-in.

z)      Click Start, click Run, type gpupdate /force in the Open field, and then press ENTER.

Note This step forces a Group Policy update on the domain controller and a replication of these changes throughout the forest.

aa)  Click Start, click Run, type http://name_of_the_issuing_CA_Server/certsrv in the Open field, and then press ENTER.

bb) If you are prompted, enter the domain administrator account name and the password.

cc)  On the Certificate Services Web page, click Request a certificate under Select a task.

dd) Click Advanced certificate request.

ee)  Click Create and submit a request to this CA.

ff)    In the Certificate template list, verify that your new certificate template appears.

3-      Submit new certificate request to the certification authority server. To do this, follow these steps on the management server (Operation Manager Server) and on the Work Group/Non Domain computer:

Note: For Operations Manager will use FQDN for server name for Work Group/Non Domain computer will use the server name.

a)      Click Start, click Run, type http://name_of_the_issuing_CA_Server/certsrv in the Open field, and then press ENTER.

b)     If you are prompted, enter the domain administrator account name and password.

c)      On the Certificate Services Web page, click Request a certificate under Select a task.

d)     Click Advanced certificate request.

e)      Click Create and submit a request to this CA.

f)       In the Certificate Template field, select the template name that you configured in step 2m. For example, selectOpsMgr2007.

g)      In the Name field, type the FQDN of the RMS server.

h)     Select the Mark key as exportable check box. When you are using the Web certificate request UI, you must also check the Store the certificate in the local compute certificate store box.

Note The certificate will be unusable if this is not done.

i)       Click Submit to submit your request to the certification authority server, and then follow the instructions that appear on the screen.

j)       Depending on the security configuration on the CA, you have to wait for an administrator to manually approve the request. It is not guaranteed that the CA can be downloaded immediately.

k)     Verify the certificate. To do this, follow these steps:

  1. Click Start, click Run, type mmc, and then press ENTER.
  2. On the File menu, click Add/Remove Snap-in.
  3. Click Add.
  4. Select the Certificates snap-in, and then click Add.
  5. Select My user account, click Finish, click Close to close the snap-in list, and then click OK to close the Add/remove snap-in window.
  6. Expand Certificates – Current User, expand Personal, expand Certificates, and then select the server certificate.
  7. Double-click the certificate, and then select the Details tab.
  8. In the list, click Enhanced Key Usage. You should see the following entries:
  • Client Authentication (1.3.6.1.5.5.7.3.2)
  • Server Authentication (1.3.6.1.5.5.7.3.1)

4-      Configure the Operations Manager server to use certificates that can be exported from the computer private store. To do this, follow these steps:

a)      Click Start, click Run, type mmc, and then press ENTER.

b)     On the File menu, click Add/Remove Snap-in.

c)      Click Add.

d)     Click Certificates, and then click Add.

e)      Select Computer account, and then click Finish.

f)       Select Local computer, click Finish, click Close to close the snap-in list, and then click OK to close the Add/remove snap-in window.

g)      Expand Certificates (local computer), expand Personal, expand Certificates, and then select a suitable certificate.

h)     Right-click the certificate, point to All tasks, and then click Export.

i)       Click Next.

j)       Select Yes, export private key, and then click Next.

k)     Use the default setting for the file format.

l)       Type a password for the file.

m)   Type a file name, and then click Next. For example, type C:\RMS.pfx.

n)     Click Finish.

  • o)     This will be done on Operations Manager server and Work Group/Non Domain computer

5-      Install the agent on the Work Group/Non Domain computer. To do this, follow these steps.
Note Because you are performing a manual installation of the agent, you must use the agent setup executable file that is available in the \Agent\i386 “for 32 bit” and \Agent\AMD64 “for 64 bit” folder in the Operations Manager distribution location.

a)      Run the MOMAgent.msi file.

b)     On the Welcome screen, click Next.

c)      When you are prompted for a folder destination for the software, accept the default location, and then click Next.

d)     When you are prompted to configure the management group information, accept the default settings, and then click Next.

e)      Type the management group name, the management server name, and the port, and then click Next.

f)       Accept the default settings, and then click Next.

g)      Verify that all information that you have entered is correct, and then click Install to start the installation.

h)     When the installation is complete, click Finished to exit the installation.

Note: Below command can be used for deploy agent thru CMD prompt:

Install Agent 32 bit:

msiexec.exe /i C:\Tools\I386\MOMAgent.msi USE_SETTINGS_FROM_AD=0 MANAGEMENT_GROUP=OperationsManager_GroupName MANAGEMENT_SERVER_DNS=OperationsManager_FQDN ACTIONS_USE_COMPUTER_ACCOUNT=1 USE_MANUALLY_SPECIFIED_SETTINGS=1 SET_ACTIONS_ACCOUNT=1

Install Agent 64 bit:

msiexec.exe /i C:\Tools\AMD64\ MOMAgent.msi USE_SETTINGS_FROM_AD=0 MANAGEMENT_GROUP=OperationsManager_GroupName MANAGEMENT_SERVER_DNS=OperationsManager_FQDN ACTIONS_USE_COMPUTER_ACCOUNT=1 USE_MANUALLY_SPECIFIED_SETTINGS=1 SET_ACTIONS_ACCOUNT=1

6-      Use the Momcertimport tool to import the certificate. To do this, follow these steps.

Note The Momcertimport tool is used to enter the serial number of the specific certificate in the registry. You must follow these steps on the management server and on the workgroup computer. Make sure that the Operations Manager agent is installed on the workgroup computer. Otherwise, you will receive an error when you run the Momcertimport tool.

Momcertimport.exe file is available in the \SupportTools\i386 “for 32 bit” and \ SupportTools \AMD64 “for 64 bit” folder in the Operations Manager distribution location.

a)      Click Start, and then click Run.

b)     In the Open field, type cmd, and then click OK.

c)      At the command prompt, type drive_letter:, and then press ENTER.

Note drive_letter is the drive on which the Operations Manager installation media is located.

d)     Type cd \SupportTools\i386, and then press ENTER.

e)      Type the following command, and then press ENTER:

MOMCertImport path_of_the_certificate .pfx_file_that_is_exported_in_step_4m

f)       Restart the OpsMgr Health service.

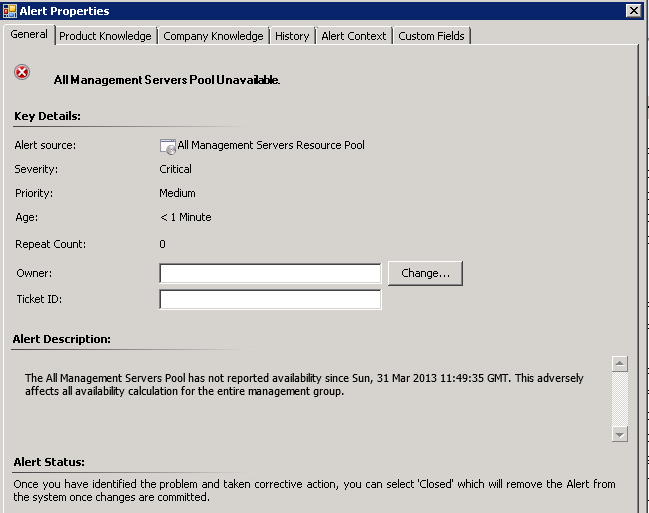
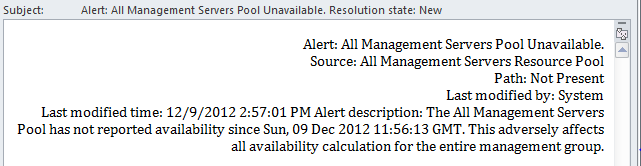
7-      Check Event viewer on Work Group/Non Domain computer under applications and Service Logs/Operations Manager you will got below error do not worry it is waiting for approval:

8-      Wait for the management server to see the manual installation and to request approval. This should take some time (five to ten minutes). When you are prompted, approve the agent. The workgroup agent can now communicate with the server.

Operations Manager 2012: Monitoring Logical Disk Free Space

1- Open Operations Manager Console.

2- Navigate to Authoring.

3- Under monitors scroll down till reach Windows Server 2008 Logical Disk >> Entity Health >> Availability >> Windows Server 2008 Logical Disk – Free Space (%) Low.

4- Right click on Windows Server 2008 Logical Disk – Free Space (%) Low >> Overrides >> Override the Monitor >> For All objects of class: Windows Server 2008 Logical Disk.

5- Reconfigure values as below then click OK.

Feel free to reconfigure the threshold as your

6- Below Alert you will got if the free space reached configured threshold